Chapter Three: Populating Amasoft
Insert, Match & Fetch — The Pattern Language
Previously
In Chapter Two you built the identity framework. The blueprint is drawn. Chapter Three brings it to life.
The Situation
Sam Rivera needs to be in the system as Amasoft’s first registered employee. Alex Chen is joining as a contractor. Michelle Rocksmasher, the CISO, needs to be registered too. The departments and systems need to exist before anyone can be placed in them or granted access to them.
Inserting the People
Time to bring in the cast — three staff members, and one identity that isn’t human. ($_ is a throwaway variable name; variables are explained later in this chapter.)
# Sam Rivera — Engineering manager, Amasoft's first registered employee
insert
  $_ isa full_time_employee,
    has name "Sam Rivera",
    has email "sam.rivera@amasoft.com",
    has phone_number "+1-415-555-0173",
    has phone_number "+1-415-555-0110",
    has status "active";
# Alex Chen — contractor on a six-month engagement
  $_ isa contractor,
    has name "Alex Chen",
    has email "alex.chen@amasoft.com",
    has phone_number "+1-415-555-0111",
    has contract_end_date 2024-07-01,
    has status "active";
# Michelle Rocksmasher — CISO, L7
  $_ isa full_time_employee,
    has name "Michelle Rocksmasher",
    has email "michelle.rocksmasher@amasoft.com",
    has status "active";
# ci-deploy-bot — Engineering's deployment service account
  $_ isa service_account,
    has name "CI Deploy Bot",
    has service_name "ci-deploy-bot",
    has owner_team "Engineering",
    has status "active";
Notice the staff have different amounts of phone numbers, and that the deploy bot is created with the same insert pattern as everyone else.
|
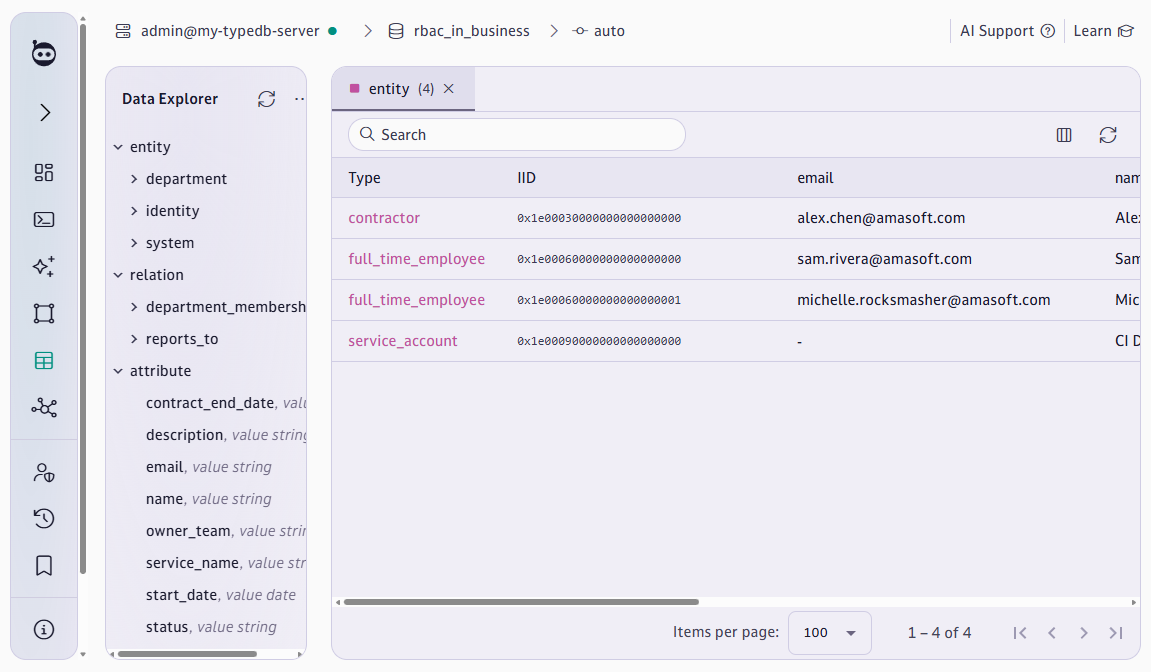
🗺️ Check the Data Explorer now
Go to the Data page in TypeDB Studio, and select 'entity' from the schema view. You should see all the data you just inserted as table rows, with columns denoting their various attributes. |
|
💡 Comments in TypeQL — lines starting with #
Lines starting with |
Departments as Schema
Let’s insert the departments. department is abstract, so we define a concrete subtype for each department:
define
entity engineering sub department;
entity finance sub department;
entity hr_dept sub department;
entity legal sub department;
Let’s take a step back here. We’ve just defined four concrete types. But each one will (most likely) only ever have one instance. Furthermore, they all have identical capabilities.
Departments as Data
Let’s try an alternative model. Departments as data means no subtypes and a concrete department type. Both changes are undefinitions - this is undefine from Chapter Two’s table. First, remove the four subtypes.
undefine
engineering;
finance;
hr_dept;
legal;
Because the four types never had instances, nothing else is affected. Second, remove @abstract so departments can be inserted directly:
undefine
@abstract from department;
It is now a single concrete type, and can have instances.
|
💡 Schema or data?
Two signs a concept should be data, not types:
For departments, both of these are true. Subtypes make sense when they differ from each other - when one subtype owns an attribute or plays a role that the others don’t. |
|
⚠️ If you see 'type department was not found'
This means department wasn’t defined in Chapter One. Run: |
Inserting Departments and Systems
insert
$_ isa department, has name "Engineering";
$_ isa department, has name "Finance";
$_ isa department, has name "HR";
$_ isa department, has name "Legal";
end;
insert
$_ isa payments_system,
  has name "PayBuddy",
  has description "Payment processing and reconciliation";
$_ isa payments_system,
  has name "Rectangle",
  has description "Point-of-sale and merchant payments";
$_ isa hr_system,
  has name "Workweek",
  has description "HR records and payroll";
$_ isa engineering_platform,
  has name "GitShed",
  has description "Source control and code review";
$_ isa engineering_platform,
  has name "EllipseCI",
  has description "CI/CD and deployment automation";
$_ isa engineering_platform,
  has name "Datacat",
  has description "Monitoring and observability";
$_ isa finance_platform,
  has name "Xilch",
  has description "Accounting and financial reporting";
end;
Inserting Relations
# Place Sam in Engineering
match
$sam isa full_time_employee, has email "sam.rivera@amasoft.com";
$eng isa department, has name "Engineering";
put
$_ isa department_membership, links (member: $sam, department: $eng);
end;
# Place Alex in Engineering, reporting to Sam
match
$alex isa contractor, has email "alex.chen@amasoft.com";
$sam isa full_time_employee, has email "sam.rivera@amasoft.com";
$eng isa department, has name "Engineering";
put
$_ isa department_membership, links (member: $alex, department: $eng);
$_ isa reports_to, links (manager: $sam, report: $alex), has start_date 2024-01-15;
end;
# Place Michelle in Legal
match
$michelle isa full_time_employee, has email "michelle.rocksmasher@amasoft.com";
$legal isa department, has name "Legal";
put
$_ isa department_membership, links (member: $michelle, department: $legal);
end;|
💡 The match-put pattern
The Why
|
|
💡 The end; marker
If |
Why Do Insert & Put Look Like This?
Amasoft is now fully populated. Step back and look at the shape of the queries you just ran.
|
⚠️ Don’t run the queries in this section
You’ve already run these queries. Reinserting Sam would just error. |
Here is Sam Rivera’s insert query:
insert
$_ isa full_time_employee,
  has name "Sam Rivera",
  has email "sam.rivera@amasoft.com";
You may be wondering: why $_? In TypeQL, this is called an anonymous variable. Compare the following query:
insert
$sam isa full_time_employee,
  has name "Sam Rivera",
  has email "sam.rivera@amasoft.com";
In this query, $sam is a named variable. You can now refer to $sam elsewhere in the query. For example, to insert a relation.
You might wonder: why do I need a variable at all? Why not just write 'insert full_time_employee, has name "Sam Rivera"'?
Compare with SQL:
-- SQL: a direct command
INSERT INTO employees (name, email)
VALUES ('Sam Rivera', 'sam.rivera@amasoft.com');
SQL says: go to this table, add a row, put these values in these columns. TypeQL works differently - it is a pattern language. You describe a pattern of what should exist, and TypeDB makes it so.
-- SQL: look up IDs first, then insert
SELECT id INTO @sam_id FROM employees WHERE email = 'sam.rivera@amasoft.com';
SELECT id INTO @eng_id FROM departments WHERE name = 'Engineering';
INSERT INTO dept_membership (member_id, dept_id) VALUES (@sam_id, @eng_id);
# TypeQL: describe the pattern in one query
match
$sam isa full_time_employee, has email "sam.rivera@amasoft.com";
$eng isa department, has name "Engineering";
put
$_ isa department_membership, links (member: $sam, department: $eng);In the TypeQL version, $sam and $eng are the handles that connect the match clause to the insert clause. This is what pattern language means in practice.
|
💡 Anonymous and named variables
Data you insert generally needs a variable name. But if you aren’t referring back to that data in the same query, you may use |
|
⭐ TypeDB Advantage: One consistent pattern language for reads and writes
In SQL, reading uses |
Your First Fetch Queries
Who is in Engineering?
|
💡 Three rules for fetch
In essence, fetch syntax is JSON syntax. |
match
$p has name $name;
$d isa department, has name "Engineering";
$_ isa department_membership, links (member: $p, department: $d);
fetch { "name": $name };|
🗺️ Switch to Table view for easier reading
By default Studio shows fetch results as JSON in the log panel. Look for the output format toggle in the results toolbar and switch it to Table - it presents results as rows and columns, which is often easier to read. |
Who reports to Sam?
match
$sam has name "Sam Rivera";
$report has name $report_name;
$_ isa reports_to, links (manager: $sam, report: $report);
fetch { "report": $report_name };
What Type Is Each Staff Member?
Querying the database schema cleanly is one of TypeDB’s most distinctive capabilities. In SQL, a row’s type is implicit - it’s whichever table the row lives in; you have to consult INFORMATION_SCHEMA for "meta" querying. In TypeDB, types are first-class data you can query, traverse, and reason about directly. Here are three versions of the same question, each revealing something different.
Query 1: All types in the hierarchy (sub)
Using sub without ! climbs the full hierarchy. A contractor appears multiple times — once for each type it belongs to:
match
$p isa $type;
$type sub identity;
$p has name $name;
fetch { "name": $name, "type": label($type) };
Alex Chen would appear four times: as contractor, temporary_staff, staff, and identity. Useful when you want the full classification chain — but often more than you need.
Query 2: Direct subtypes only (sub!)
Adding ! constrains the result to direct subtypes only — one level down from the specified type:
match
$p isa $type;
$type sub! staff;
$p has name $name;
fetch { "name": $name, "type": label($type) };
Now Alex appears once — as temporary_staff, the direct subtype of staff that applies. Sam appears as permanent_staff. Much cleaner, but still not necessarily the most specific type if the hierarchy goes deeper.
Query 3: The most specific type (lowest in hierarchy)
This query finds the single most precise type for each staff member — the lowest node in the hierarchy they belong to:
match
$p isa! $type;
$p has name $name;
fetch { "name": $name, "type": label($type) };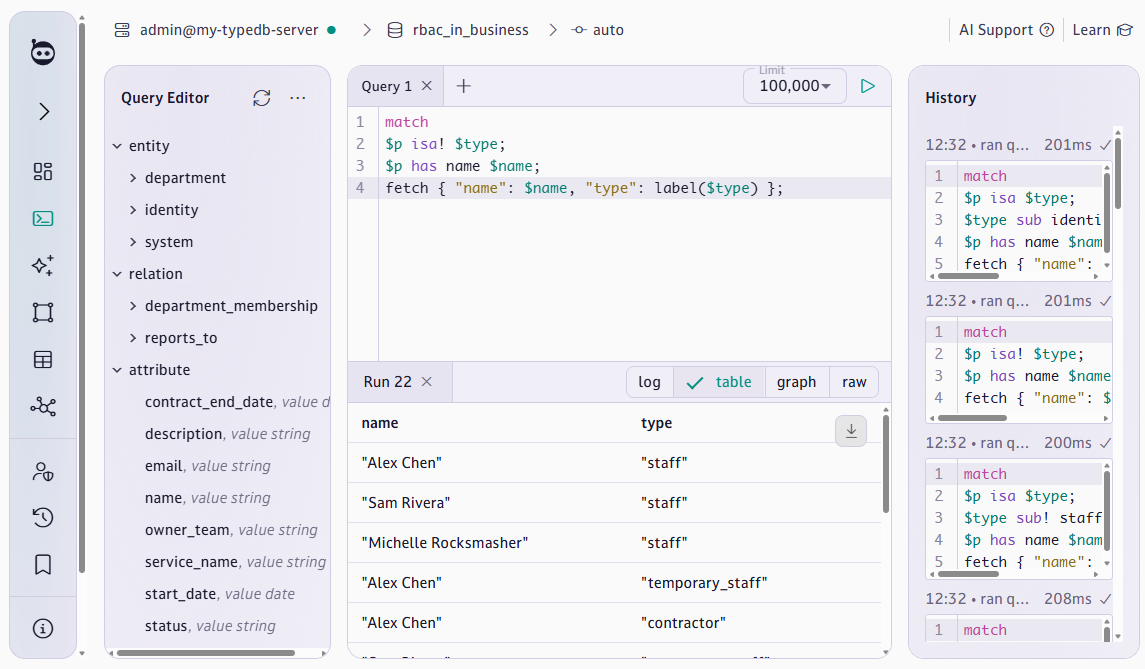
The isa! keyword is the key: it retrieves the most specific type of an instance.
|
⭐ TypeDB Advantage: Types are first-class queryable data
In SQL, getting the most specific type of a row requires a discriminator column, application logic, or querying multiple tables. In a property graph database, node labels are stored but not traversable in a type hierarchy. In TypeDB, the entire type system is queryable. You can ask 'what is the most specific type of this identity?' in a single declarative query. The schema enforces the hierarchy; the query traverses it. |
Alex’s First Promotion — contractor to full-time employee
Alex’s contract period is ending and they’ve been offered a full-time role. Let’s promote Alex to a full-time employee!
# Step 1: Delete department_membership
match
$alex isa contractor, has email "alex.chen@amasoft.com";
$dm isa department_membership, links (member: $alex);
delete $dm;
# Step 2: Delete reports_to bond
match
$alex isa contractor, has email "alex.chen@amasoft.com";
$rt isa reports_to, links (report: $alex);
delete $rt;
# Step 3: Delete the contractor record
match $alex isa contractor, has email "alex.chen@amasoft.com";
delete $alex;
# Step 4: Reinsert as full_time_employee
insert $_ isa full_time_employee,
  has name "Alex Chen",
  has email "alex.chen@amasoft.com",
  has status "active";
# Step 5: Recreate department_membership and reports_to
match
$alex isa full_time_employee, has email "alex.chen@amasoft.com";
$eng isa department, has name "Engineering";
$sam isa full_time_employee, has email "sam.rivera@amasoft.com";
insert
$_ isa department_membership, links (member: $alex, department: $eng);
$_ isa reports_to, links (manager: $sam, report: $alex),
  has start_date 2024-07-01;
TypeDB lets you combine matches, inserts, and deletes into arbitrarily long "pipelines", and runs the entire pipeline as a single query.
|
⚠️ To delete an entity, delete its relations first
TypeDB’s cardinality constraints protect data integrity during deletes as well as inserts. If a relation has |
Chapter Three Challenge
|
🎯 Challenge: Populate Amasoft
|